Exporting Components
This blog series introduces you to Entando’s Command Line Interface (ENT) which simplifies building and deploying applications for Kubernetes.
ENT CLI Series
- Simplify App Development on Kubernetes with ENT CLI
- Quickstart Environment
- Packaging and Deployment
- Working with Multiple Environments
- Exporting Components → This lesson
- Utilities & Diagnostics
What You’ll Learn
In this lesson, we’ll learn how to use ENT CLI to export any component from an Entando application including up to an entire application for migration to other environments.
Concept Review
Entando is an application composition platform that enables developers to compose applications from containerized components like microservices and micro frontends. Entando packages components together for deployment to Kubernetes into bundles.
Working With Bundles
Today, we’ll explore the bundler command to extract any component from an Entando application into a bundle.
$ ent bundler -h Usage: entando-bundle [options] [command] A tool to interact with Entando's Digital-Exchange bundles Options: -V, --version output the version number -h, --help output usage information Commands: from-npm [options] Generates an Entando's Content Digital-Exchange bundle k8s custom resource from-git [options] Generates an Entando's Content Digital-Exchange bundle k8s custom resource using repository from-env [options] Generates an Entando Bundle from an existing environment into the current or selected location
Entando Bundler has 3 primary commands:
- from-npm: For legacy support. No longer used in the latest version (6.3+).
- from-git: For packaging components for deployment to Kubernetes.
- from-env: For exporting application components for migration to other environments.
Note: Entando’s Digital-Exchange is now the Entando Component Repository. Think of this as the nexus or hub to share ready-to-use components with other development teams across one or more Entando applications.
Exporting Components From Your Application
Let’s take a look at the from-env sub command to find out how to export components from a running Entando application.
$ ent bundler from-env -h Usage: entando-bundle from-env [options] Generates an Entando Bundle from an existing environment into the current or selected location Options: --env The location for the env.json file containing the description of the environment to export (default: "env.json") --location The location for where to store the generated Bundle (default: "./") --code The code (unique identifier) for the Bundle --description The description of the Bundle -h, --help output usage information
Configure Environment Access
To configure access to your Entando application, we’ll need:
- Authorization
- Access to Entando APIs
- Access to Kubernetes APIs
These are configured by creating an env.json file.
{ # Access to Entando APIs "coreBaseApi": "http:///entando-de-app", # Access to Entando Cluster Infrastructure APIs "k8ssvcApi": "http:///k8s", # Keycloak Client ID to access Entando APIs "clientId": "", # Keycloak Secret "clientSecret": "" }
Authorization
To grant authorization to access Entando’s APIs, create a Keycloak Client with the relevant roles.
Entando APIs
Entando’s APIs are exposed via the Entando App Engine. We can find the URL for the Entando App Engine from the ingress:
ent kubectl get ingress -n entando -o jsonpath='{.items[2].spec.rules[*].host}{.items[2].spec.rules[*].http.paths[0].path}{"\n"}'
Sample Output: quickstart-entando.192.168.64.40.nip.io/entando-de-app
Note: The jsonpath is a convenience command to get the URL directly, but you can also look up the URLs using standard kubectl commands.
ent kubectl get ingress -n entando -o yaml
Kubernetes APIs
Finally, we can access the Kubernetes APIs via the Entando Cluster Infrastructure.
ent kubectl get ingress -n entando -o jsonpath='{.items[1].spec.rules[*].host}{.items[1].spec.rules[*].http.paths[*].path}{"\n"}'
Sample Output: quickstart-eci-entando.192.168.64.40.nip.io/k8s
Sample env.json
Here’s what your env.json should look like one you’ve completed the steps:
{ "coreBaseApi": "http://quickstart-entando.192.168.64.40.nip.io/entando-de-app", "k8ssvcApi": "http://quickstart-eci-entando.192.168.64.40.nip.io/k8s", "clientId": "entando-bundler", "clientSecret": "da95278e-40db-4be4-9aaf-88eaf2b6070b" }
Interactive Command Line
The Entando Bundler can be run as an interactive terminal application or as a single command for scripting.
$ ent bundler ? What do you want to do? (Use arrow keys) Generate a custom-resource based on an existing bundle project ❯ Create a new bundle using components from an environment
In our case, let’s export the components from an existing environment.
Entando Environment
? Please select an env.json file with the environment variables: (env.json)
Press enter to select the default location to read your env.json from the current working directory.
Select Components
? Which type of components do you want to add to the bundle? (Use arrow keys) ❯ All components Pages Page templates UX Fragments Microfrontends / Widgets Microservices Content Types Contents CMS Assets Groups Categories Labels
Select “All components” to export the entire application.
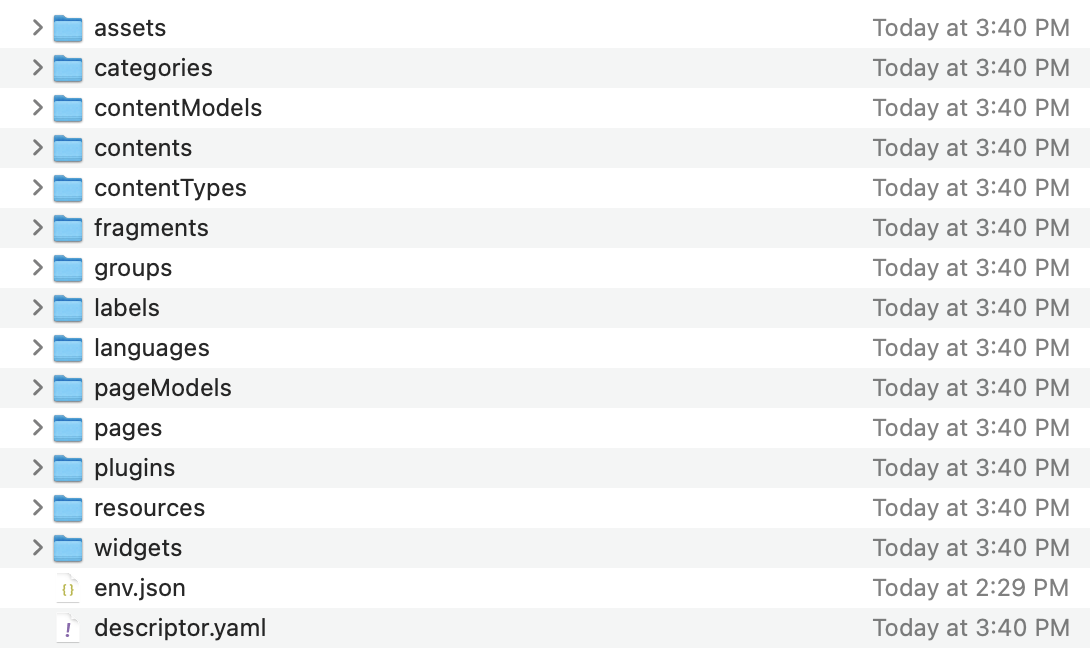
Collecting all components from the provided environment... Collecting widgets Collecting pageModels Collecting fragments Collecting pages Collecting groups Collecting contentTypes Collecting contentModels Collecting assets Collecting contents Collecting plugins Collecting categories Collecting labels Collecting languages ? Do you want to generate the Bundle with the selected components? (Y/n) y
Bundle Directory
? Where do you want to generate the Bundle? (./)
Press enter to generate the bundle and its components in the current working directory.
Unique Identifier
? What's the code for the Bundle?
Enter a unique identifier for the bundle (e.g., “export-bundle”).
Bundle Description
? Please add a description to the Bundle:
Enter a description for the bundle (e.g., “Sample Export Bundle”).
Sample Output
Once you’ve finished entering the prompts, ENT will generate a bundle with all of the frontend and backend components needed to recreate your Entando application.
Generating bundle... Collecting File: ... Processing widget: hello-widget ... Processing pageModel: 1-2-column ... Processing fragment: breadcrumb ... Processing page: homepage ... Processing contentType: bnr ... Processing content: bnr2 ... Processing contentModel: 2-column-content ... Processing labels Processing languages Saving bundle descriptor at ./descriptor.yaml
Run as a Single Command
You can also run the bundler as a single command for scripting.
$ ent bundler from-env \ --env env.json \ --code export-bundle \ --description "Sample Export Bundle"

How to Use
The ability to export an entire Entando application as frontend and backend components opens up several practical uses for developers.
Backup & Restore
In addition to backing up individual components, developers can export an Entando application at a specific point in time including all application level code like microservices and JavaScript micro frontends as well as page templates and user editable content. Developers are able to “image” an entire Entando application as code, version it in a Git repository, and create multiple restore points.
Data Migration
Infrastructure teams can use the bundler command to:
- Migrate an entire Entando application including all data, content, and styling from DEV to QA to PROD.
- Take an exact snapshot of a running Entando application in a production environment including any user editable content.
- Create a staging environment where content editors can make changes and preview website updates before pushing those changes live.
Unlike typical scenarios where the data, file system, and code are backed up separately, ENT simplifies life for infrastructure teams by enabling backup, restore, and migration with a single command.
Packaged Business Capabilities
System integrators can create “solution templates” for business teams to quickly bring up an HR Portal, generate sites that are customized to the organization’s needs and requirements, and deliver Packaged Business Capabilities that deliver a specific business need or value that can be installed by one or more Entando applications.
Packaging Components For Deployment to Kubernetes
In a previous blog post in this series, we covered how ENT makes it easy for developers to deploy application updates to Kubernetes:
- Build project: ent prj init
- Publish to GitHub: ent prj pbs-publish
- Deploy to Kubernetes: ent prj deploy
- Install in your Entando Application: ent prj install
Behind the scenes, ENT uses the bundler “from-git” command to package the components for deployment to Kubernetes during the deploy step.
ent bundler from-git --name=example-bundle --namespace=entando --repository=https://your/remote/repository.git --dry-run > example-bundle.yaml
The output of the command is a Kubernetes Custom Resource yaml. Developers should use the “ent prj” commands to simplify their development lifecycle, but we’ll also cover how Entando uses Kubernetes Custom Resources to deploy updates to your application.
How Entando Deploys Application Updates to Kubernetes
- Package your components for deployment as a bundle.
(Kubernetes Custom Resource: EntandoDeBundle) - Apply the Custom Resource in your cluster (kubectl apply).
- Get the list of available bundles (Custom Resources) from the Entando Component Repository (ECR).
- Install the bundle from the ECR.
- Pull CMS assets from the specified GitHub repository, and add them to Entando’s database.
- Pull static resources from the specified GitHub repository, and upload them to Entando’s File Browser.
- (Microservices): Read the manifest and install or update the pod for that image, and add the corresponding service and ingress.
What’s Next?
In this blog, we learned how to use the bundler command to:
- Backup and restore an Entando application.
- Migrate an Entando application across environments.
- Create Packaged Business Capabilities. → Bundled solutions that meet a specific business need or value.
- Package updates for deployment to Kubernetes.
In the next lesson, we’ll cover the diagnostics and utilities ENT provides to help debug problems in your Entando application.
